Creating Schedules
To setup Scheduling, navigate to:
- Dashboard
- Schedules
- Select the User(s.) To select more than one User, you can hold CTRL on your keyboard + click on the user's names. You can also click on the check-mark box next to the name search to select all.
- To select the days that you are Scheduling, you can either:
- Click on any one day on the calendar
- Click then drag from the first desired date to the last.
- Click on the Schedule Options drop-down menu and select the Create Schedules option.

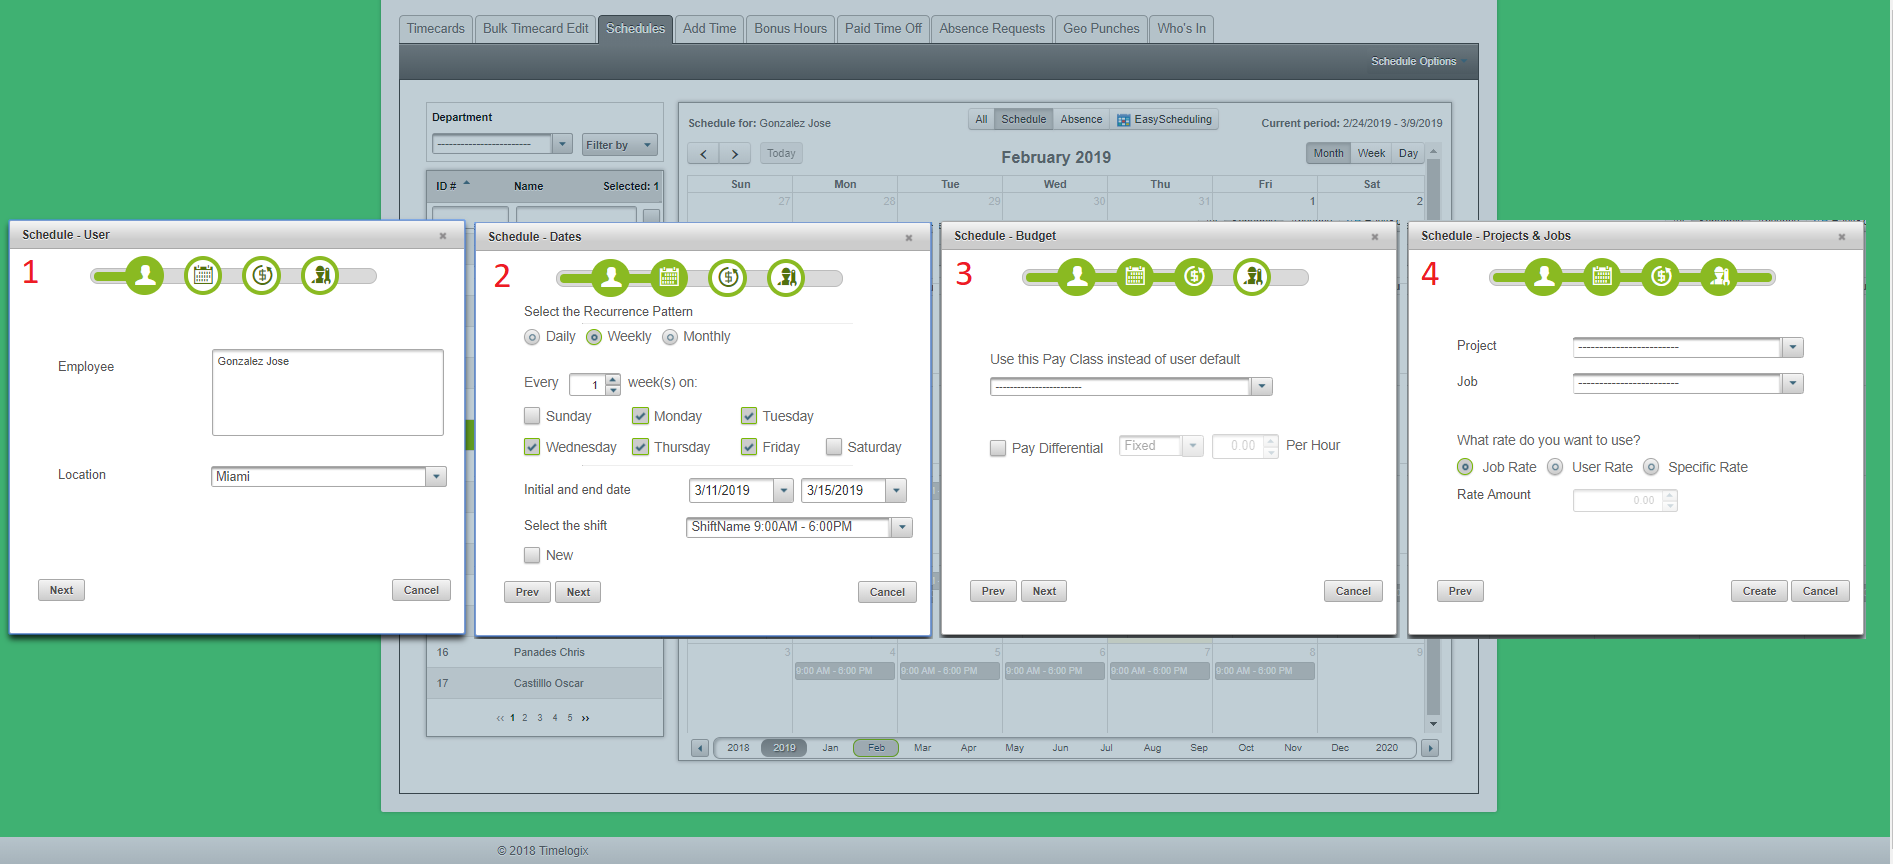
Once you have selected your Create option, a window will appear and you will be prompted through 4 sections:
Section 1:
You will see the User(s) name(s) and you will be able to associate a location to the Schedule you are creating.
Click Next.
Section 2:
- Select the Recurrence pattern. Typically, we have found that most companies will use the weekly recurrence by default.
- Choose the days of the week that the User will be scheduled for.
- Select the Initial and End date of this Schedule.
- Select the Shift. (To view a step-by-step breakdown on creating Shifts under the Settings, please take a look at the Settings guide.)
Otherwise, you can also create a new shift directly from this Window by clicking the New check-mark box.
Click Next.
Section 3 (Optional):
Here, you can change the User's Pay Class (set of work rules, including overtime, double-time, lunches and breaks) for the duration of the Schedule you are creating.
You can also apply a Pay Differential (X amount of dollars more than their base rate) for the schedule as well.
Click Next.
Section 4 (Optional):
If applicable, you can assign a Project and Job to the Schedule you are creating. The Project and Job you assign will register for the duration of the schedule. You can then choose to use the Job Rate, User Rate or a different Specific Rate altogether.
For information on Projects and Jobs, please contact the Timelogix Customer Support line.
Click Create when you are done.
Managing Out of Shift
When a User has a schedule and works any time outside of their assigned shift, the extra time falls under what Timelogix considers Out of Shift time. This is time that is segmented from the Users original, scheduled Regular hours.
For example: Daniel Smith is scheduled to work from 9:00am - 5:00pm.
Scenario: Daniel Smith actually worked from 8:55am - 5:02pm.
In this case, Daniel would have a total of 7 Out of Shift minutes:
- 5 minutes before 9:00am
- 2 minutes after 5:00pm
Before the pay period is over, an Administrator or Manager can review the Out of Shift for any User and either choose to approve the extra time, or leave it as unpaid, Out of Shift hours.
To approve Out of Shift time, navigate to:
- Dashboard
- Timecards
- Select the User
- Click on the Out of Shift icon

If there is Out of Shift at the In and Out time, then two selections will appear. Select the Out of Shift that you wish to approve by clicking on the pertaining check-mark box.
Click the green check-mark to Save.
Comments
0 comments
Please sign in to leave a comment.